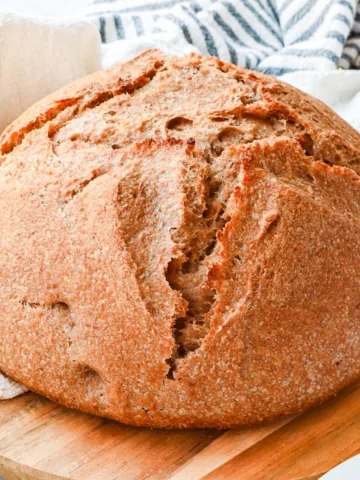
This same day sourdough bread made with fresh milled flour combines convenience with exceptional flavor, perfect for those who want fresh, homemade bread without the long rise times. The fresh milled flour adds depth and nutrition, creating a hearty, flavorful loaf with a satisfying crumb and a slightly tangy sourdough taste. Ready in just a few hours, this recipe is ideal for busy bakers who crave the wholesome goodness of sourdough with minimal effort.

This post contains affiliate links, which means I make a small commission at no extra cost to you. See my full disclosure here.
Table of Contents
What is freshly milled whole wheat flour?
Freshly milled whole wheat flour is flour that is ground directly from whole wheat berries (the entire wheat kernel, including the bran, germ, and endosperm) using a grain mill. This flour is considered "freshly milled" because it is ground just before use, preserving the full nutritional benefits and natural flavors of the wheat. It has a richer, more complex flavor compared to store-bought whole wheat flour, and it's packed with more nutrients, such as fiber, vitamins, and minerals, since the wheat's natural oils and nutrients haven't been removed during processing.
Freshly milled whole wheat flour tends to have a coarser texture and a slightly darker color due to the presence of the bran and germ. It also has a more pronounced, nutty taste and can add depth to baked goods, making them heartier and more flavorful. It’s often used by people who prefer to bake with whole, unprocessed ingredients for a more wholesome and nutritious result.
Is buying a grain mill worth it?
Yes! Buying a grain mill can be worth it if you bake often and value fresh, nutritious, and flavorful flour. It offers control over quality and cost in the long run, but it requires an upfront investment, time, and space. If you're a casual baker, it might not be necessary. The grain we love for home-milled flour is the Wondermill. I find that it has the best reviews and will last if you are an avid baker like me!
Can I substitute fresh milled flour for all-purpose flour?
Yes, you can substitute freshly milled flour for all-purpose flour in most recipes, but there are a few things to keep in mind when doing so.
- Hard Wheat Varieties: If you want to swap fresh milled hard wheat flour for all-purpose flour, you can start by replacing it 1:1 in your recipe.
- For Soft Wheat Varieties: Increase the amount of freshly milled soft wheat flour by ¼ cup for every 1 cup of flour called for in the recipe.
In regard to using either type of flour, if the dough or batter feels too thick or dry, add a little extra liquid (water, milk, or oil) to get the right consistency, and vise versa, if the dough is too wet add back in small amounts of flour until you reach the consistency you like. Keep in mind that the wheat takes time to absorb the liquid, so you may want to allow it to sit for a while before adding more flour to find out if you truly need it.
Does fresh milled flour go bad?
Yes, freshly milled flour can go bad over time, and it generally has a shorter shelf life compared to store-bought, refined flours. This is because freshly milled flour contains the germ, which is rich in oils. These oils can become rancid more quickly than the more refined components of flour, leading to spoilage.

Equipment for Sourdough Whole Grain Bread
Banneton basket (DIY basket)
Large bowl
Tea towel, plastic bag, or homemade bowl cover
Dutch oven
Piece of parchment paper
Wooden spoon or Danish dough whisk

Ingredients for this Same Day Sourdough Bread Recipe
- 2 ⅔ cups (200g) fresh milled hard red wheat berries
- 2 ½ cups (300g) fresh milled hard white wheat
- 1 ⅔ cups (400g) warm water
- ½ cup (100g) active sourdough starter (fed and bubbly)
- 2 teaspoons (11g) salt
Fresh Milled Whole Wheat Sourdough Recipe
Begin by feeding your sourdough starter before going to bed the night before you plan to bake.
The next day–
First thing in the morning, prepare your dough for the bulk fermentation (first proofing stage).


Combine Ingredients: In a mixing bowl, mix together the fresh flour, warm water, active sourdough starter, and salt. Stir with a wooden spoon or dutch dough whisk in a circular motion until the ingredients are roughly combined. The dough will look like a shaggy dough at this stage.


- Rest the Dough: Cover the bowl with a damp towel, plastic wrap, or a plastic bag and let the dough rest in a warm place for 45 minutes. This allows the whole grain flour to fully hydrate and begins the gluten development process.


- Stretch and Fold (First Set): After the resting period use clean wet hands to gather the dough from one side of the bowl, stretch it out and fold it onto itself. Turn the bowl a quarter turn and repeat the stretching and folding process. The dough should form a somewhat square shape. Cover the bowl again with a damp kitchen towel and let the dough rest for another 30 minutes.
- Repeat Stretch and Fold Process: After the 30-minute rest, perform another set of stretch and folds. This involves stretching out the dough from opposite ends and folding them over each other. Turn the bowl and repeat the process. Cover the bowl and let the dough rest for another 30 minutes. Repeat this step one more time for a total of three sets of stretches and folds.
- First Rise: After completing the stretch and fold process three times, cover the bowl again and let the dough undergo its first rise. Place the dough in a warm spot or in your oven with the light on and door propped open. The light should provide enough heat (without being too hot) to help the dough rise faster. It should take about 3 hours for the dough to double in size.
Setting up for the final rise
- Once the dough has doubled in size, gently pull it together to form a ball, being careful not to deflate any of the precious bubbles your starter has worked hard to create!

- Place the smooth side of the dough face down into a floured banneton or a bowl lined with a floured tea towel, with the seam side facing out. Cover it with plastic wrap or a damp towel, then refrigerate for the second rise for 3 hours. For a more sour flavor, you can let it rise at room temperature instead, but be aware that it may be more challenging to score the dough if it's not chilled.

Baking your fresh bread
- After the final rise, remove the proofing basket from the fridge, Gently turn the dough over onto a piece of parchment paper, score the dough with a razor blade, and then place the dough into the dutch oven with the lid on. Place the dutch oven into the oven and turn the oven on to 450 degrees.
- Bake for 55 minutes. Remove the lid of the dutch oven and bake for another 5 minutes or until it is golden brown.
- Once baking is finished, carefully remove the sourdough loaf from the dutch oven and place on a cooling rack.
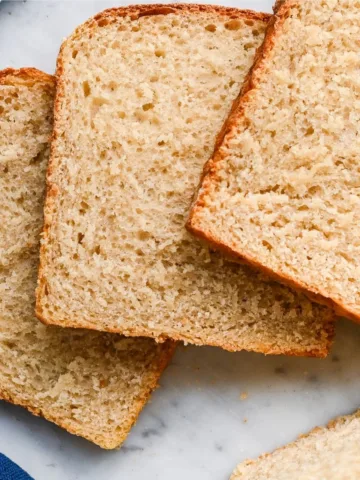
- Let the bread cool for at least an hour before slicing. While it’s tempting to cut right away, allowing the bread to cool fully will prevent the crumb from becoming mushy.
- After your whole wheat sourdough bread has cooled, cut with a sharp knife and enjoy with fresh homemade butter and peach jam!

More Delicious Homemade Sourdough Bread Recipes

Same Day Sourdough Bread with Fresh Milled Flour
Equipment
- Banneton basket (DIY basket)
- Large bowl
- Tea towel, plastic bag, or homemade bowl cover
- Dutch oven
- Piece of parchment paper
- Wooden spoon or Danish dough whisk
Ingredients
- 2 ⅔ cups 200g fresh milled hard red wheat berries
- 2 ½ cups 300g fresh milled hard white wheat
- 1 ⅔ cups 400g warm water
- ½ cup 100g active sourdough starter (fed and bubbly)
- 2 teaspoons 11g salt
Instructions
- Begin by feeding your sourdough starter before going to bed the night before you plan to bake.
The next day
- First thing in the morning, prepare your dough for the bulk fermentation (first proofing stage).
- Combine Ingredients: In a mixing bowl, mix together the fresh flour, warm water, active sourdough starter, and salt. Stir with a wooden spoon or dutch dough whisk in a circular motion until the ingredients are roughly combined. The dough will look like a shaggy dough at this stage.
- Rest the Dough: Cover the bowl with a damp towel, plastic wrap, or a plastic bag and let the dough rest in a warm place for 45 minutes. This allows the whole grain flour to fully hydrate and begins the gluten development process.
- Stretch and Fold (First Set): After the resting period use clean wet hands to gather the dough from one side of the bowl, stretch it out and fold it onto itself. Turn the bowl a quarter turn and repeat the stretching and folding process. The dough should form a somewhat square shape. Cover the bowl again with a damp kitchen towel and let the dough rest for another 30 minutes.
- Repeat Stretch and Fold Process: After the 30-minute rest, perform another set of stretch and folds. This involves stretching out the dough from opposite ends and folding them over each other. Turn the bowl and repeat the process. Cover the bowl and let the dough rest for another 30 minutes. Repeat this step one more time for a total of three sets of stretches and folds.
- First Rise: After completing the stretch and fold process three times, cover the bowl again and let the dough undergo its first rise. Place the dough in a warm spot or in your oven with the light on and door propped open. The light should provide enough heat (without being too hot) to help the dough rise faster. It should take about 3 hours for the dough to double in size.
Setting up for the final rise.
- Once the dough has doubled in size, gently pull it together to form a ball, being careful not to deflate any of the precious bubbles your starter has worked hard to create!
- Place the smooth side of the dough face down into a floured banneton or a bowl lined with a floured tea towel, with the seam side facing out. Cover it with plastic wrap or a damp towel, then refrigerate for the second rise for 3 hours. For a more sour flavor, you can let it rise at room temperature instead, but be aware that it may be more challenging to score the dough if it's not chilled.
Baking your fresh bread.
- After the final rise, remove the proofing basket from the fridge, Gently turn the dough over onto a piece of parchment paper, score the dough with a razor blade, and then place the dough into the dutch oven with the lid on. Place the dutch oven into the oven and turn the oven on to 425 degrees.
- Bake for 55 minutes. Remove the lid of the dutch oven and bake for another 5 minutes or until it is golden brown.
- Once baking is finished, carefully remove the sourdough loaf from the dutch oven and place on a cooling rack.
- Let the bread cool for at least an hour before slicing. While it’s tempting to cut right away, allowing the bread to cool fully will prevent the crumb from becoming mushy.
- After your whole wheat sourdough bread has cooled, cut with a sharp knife and enjoy with fresh homemade butter and peach jam!